Techies Hangout Headline Animator

Techies Hangout

Featured Video

Paper Phone - Flexible Smartphone

A prototype flexible smartphone made of electronic paper has been created by Canadian researchers

Beautiful Wordpress Themes

Best and Beautiful Wordpress themes available, to enhance your blogging experience

5 Best Windows7 Applications that make your PC function Smarter

Nokia N-900

The Nokia N900 has evolved from Nokia's previous generation of Internet Tablets and broadens the choice for technology enthusiasts who appreciate the ability to multitask and browse the internet like they would on their desktop computer.

Ten Best Notebooks

Ten Best Notebooks Available in the Market

Showing posts with label Tips and Tricks. Show all posts

Sunday, June 26, 2011

Use your Pendrive (External Memory) as RAM

Top Blogs

Yes with some modified settings you can use your pen drive as a RAM

1) Connect your pen drive to your PC [pen drive should be at least 1 GB or if you having 4 GB then its better]

2) Allow PC what he is supposed to do,let system to detect pen drive.

3) After your PC finished with its detection work,you have to do some little

4) Right click on the My Computer and select the properties

5) Goto advanced and then performance setting then advanced then

6) Select pen drive and click on custom size " Check the value of space available "

7) Enter the same in the Initial and the Max columns

" You just used the memory of the Pen Drive as a Virtual Memory "

8) Now restart your PC and enjoy your fast and super system.

5 Steps to prevent your USB from Virus

Top Blogs

You have a USB and I'm sure that you had problem with it more than 1 time. The main reason is because of virus. And you will use antivirus software to delete these damn viruses, or might format it. But it is said that Prevention is better than cure.
I'll show you some simples step to prevent your beloved USB from virus

So how can you know that your USB is infected? When you right click your USB, you will see Autoplay in Bold in the first line. It means that your USB has been infected with virus, 90% possibility! Because the first line should be Open or Expore instead of Autoplay Virus can be communicated to USB because it copies itself to USB and creat a file autorun.inf to activate virus itself. And it is so smart to be in hidden form.
When you insert a USB to your computer, it takes advantage of your habit of double-click on USB symbol in My Computer to break into your computer. There, it duplicates and disperses to everywhere. Their next patients are other USB inserting to the computer.

You may follow these 5 steps to make a shell for your USB:

Step 1:Check your USB's name. For ex, your USB drive is E: and label is THANHNGOC

Step 2:Convert file system of USB into NTFS: Start > Run, type: convert : /FS:NTFS. For ex, with your USB in drive E, you type: convert E: /FS:NTFS. Note: if your USB has function of MP3 and sound record, you should skip this step, because your multimedia player can not run MP3 files in your USB.

Step 3:Create an autorun.inf with whatever content you want; even let it empty is okay. Copy that autorun file to your USB. (You may create file autorun.inf by: Click Tools on menu > > Folder Option> Ch?n View > Remove Tick in square Hide Extentions for known file types> OK. Then make a new folder and name its autorun.inf. After that, you have to come back to select Hide Extentions for known file types. Otherwise, all file names are so frustrated.)

Step 4:Right-click on the autorun file > Property > Tick Read Only, you may choose Hidden

Step 5:Prevented all access to file autorun.inf: Click Start > Run > type: cacls \autorun.inf /D Everyone. For ex, you type cacls E:\autorun.inf /D Everyone. A black window will appear and it may require you to type USB label. Type its name (I type THANHNGOC) and Enter. It takes about 5 seconds to complete.

I do not say that you may prevent your USB from all viruses, but this way partly help your USB be safe to most virus infecting via USB. The last
recommend is to install a reliable antivirus software with automatic update.

Sunday, May 22, 2011

ICS Internet Connection Sharing on Windows XP

Top Blogs

Internet Connection Sharing on Windows XP


Internet Connection Sharing on Windows XP

This trick shows you how to share your internet connections on multiple computers within a workgroup with Windows XP. Windows XP has a built-in feature that called "Internet Connection Sharing" (ICS) that allows home users to share their internet connections on multiple computers.
If you are not familiar with the network configurations, the easiest way to share your internet connection is to purchase a router or hub. Use this trick only if you don't have a router, or don't want to use a router, or if you just want to try out the feature.
A simple way to understand this feature is, you are making your host computer (the computer directly connects to the internet) functioning as a router for other computers.

What do you need?

  • A "Host" computer that running Windows XP. This computer must have at least TWO (2) network adapters. One adapter - let's call it "Adapter #1" - connects to the internet and another, "Adapter #2", connects to a hub or directly to other computers.
  • Client computer(s), which run any version of Windows. A client computer can be connected to the host computer directly by a cross-over cable or indirectly through a hub.
  • This trick assumes that the host computer is connected to the internet and you are able to access the internet on this computer.


Configure the Host Computer

  1. Logon the host computer as Administrator.
  2. Click Start >> Control Panel.
  3. Click Network and Internet Connections.
  4. Click Network Connections.
  5. Right-click the connection that you use to connect to the internet (the connection with Adapter #1). This connection can be either a high-speed internet connection or a dial-up connection.
  6. Click Properties.
  7. Click Advanced tab.
  8. Under Internet Connection Sharingselect the Allow other network users to connect through this computer's Internet connection check box.
  9. If you are sharing a dial-up Internet connection, select the Establish a dial-up connection whenever a computer on my network attempts to access the Internet check box if you want to permit your computer to automatically connect to the Internet.
  10. Click OK. You'll reieve the following message:
    When Internet Connection Sharing is enabled, your LAN adapter will be set to use IP address 192.168.0.1. Your computer may lose connectivity with other computers on your network. If these other computers have static IP addresses, it is a good idea to set them to obtain their IP addresses automatically. Are you sure you want to enable Internet Connection Sharing?
  11. Click Yes.

Configure the Client Computer(s)
To use the shared connection from the Host computer, a client computer must be configured with "Automatic IP address". The main configurations are:
  1. Configure TCP/IP Automatic IP
  2. Configure Internet Connection
The steps for the above two configurations are vary on different versions of Windows.
The following procedures are for Windows XP client computers.
  1. Log on to the client computer as Administrator or as Owner.
  2. Click Start >> Control Panel.
  3. Click Network and Internet Connections.
  4. Click Network Connections.
  5. Right-click Local Area Connection, and then click Properties.
  6. Click the General tab, click Internet Protocol (TCP/IP) in the This connection uses the following items list, and then click Properties.
  7. In the Internet Protocol (TCP/IP) Properties dialog box, click Obtain an IP address automatically (if it is not already selected), and then click OK.

  8. Click Start >> Control Panel
  9. Click Network and Internet Connections.
  10. Click Internet Options.
  11. In the Internet Properties dialog box, click the Connections tab.
  12. Click the Setup button. The New Connection Wizard starts.
  13. On the Welcome to the New Connection Wizard page, click Next.
  14. Click Connect to the Internet, and then click Next.
  15. Click Set up my connection manually, and then click Next.
  16. Click Connect using a broadband connection that is always on, and then click Next.
  17. On the Completing the New Connection Wizard page, click Finish.
  18. Exit Control Panel and test the internet. You might need to restart the computer.

Friday, May 20, 2011

Microsoft Word Shortcut Keys

Top Blogs


Microsoft Word Shortcut Keys


Microsoft Word Shortcut Keys

The followings are shortcut keys and mouse shortcuts that can be used for Microsoft Word
Use at your own risk.
Mouse shortcuts

ShortcutDescription
Double-click (on a word)Select the word.
Single-click (anywhere in a sentence) + Holding CTRLSelect the entire sentence.
Triple-click (anywhere in a paragraph)Select the entire paragraph.
Click, hold, drag, then releaseSelect text from the click position to release position.
Click first position, hold SHIFT key, then click 2nd positionSelect text from the 1st position to the 2nd position.
Hold ALT key, then click and dragVertical select text.
Hold CTRL key, then scroll wheelZoom in/out.


Keyboard shortcuts

ShortcutDescription
Ctrl + ASelect all (including text, graphics).
Ctrl + BBold.
Ctrl + IItalic.
Ctrl + UUnderline.
Ctrl + CCopy.
Ctrl + VPaste.
Ctrl + XCut.
Ctrl + FFind.
Ctrl + ZUndo.
Ctrl + YRedo.
Ctrl + POpen the print dialog.
Ctrl + KInsert link.
Ctrl + LLeft align.
Ctrl + ECenter align.
Ctrl + RRight align.
Ctrl + MIndent.
Ctrl + (left arrow)Moves one word to the left.
Ctrl + (right arrow)Moves one word to the right.
Ctrl + (up arrow)Moves cursor to the beginning of the paragraph.
Ctrl + (down arrow)Moves cursor to the end of the paragraph.
Ctrl + Shift + FChange font.
Ctrl + Shift + *View/hide non-printing characters.
Ctrl + DelDeletes word to the right of cursor.
Ctrl + BackspaceDeletes word to the left of cursor.
Ctrl + EndMoves cursor to the end of document.
Ctrl + HomeMoves cursor to the beginning of document.
Ctrl + SpacebarReset highlighted text to the default font.
Ctrl + 1Single-space.
Ctrl + 2Double-space.
Ctrl + 51.5-line.
Ctrl + Alt + 1Format text: heading 1.
Ctrl + Alt + 2Format text: heading 2.
Ctrl + Alt + 3Format text: heading 3.
F1Help.
F4Repeat the last action
F5Go to .
F7Spelling and grammar.
F12Save as.
F8 then (left arrow)Increase selection to the left by one character
F8 then (right arrow)Increase selection to the right by one character
Ctrl + F1Task Pane.
Ctrl + F2Print preview.
Alt + Ctrl + F2New document.
Shift + F3Cycle between capitalized formats
Ctrl + InsertCopy.
Shift + InsertPaste.
Shift + EndSelect from current position to the end of the line.
Shift + HomeSelect from current position to the beginning of the line.
Ctrl + Shift + (left arrow)Select from current position to the beginning of the word.
Ctrl + Shift + (right arrow)Select from current position to the end of the word.
Ctrl + Shift + (up arrow)Select from current position to the beginning of the document.
Ctrl + Shift + (down arrow)Select from current position to the end of the document.
Ctrl + Shift + Page UpSelect from current position to the beginning of the window.
Ctrl + Shift + Page DownSelect from current position to the end of the window.
Shift + Page UpOne screen page up.
Shift + Page DownOne screen page down.
Shift + F7Thesaurus check selected text.
Shift + F12Save.
Ctrl + Shift + F12Print.
Alt + Shift + DInsert the current date.
Alt + Shift + TInsert the current time.

Tuesday, May 17, 2011

Microsoft Excel Shortcut Keys, Basic, Easy and Useful

Top Blogs


Microsoft Excel Shortcut Keys


Microsoft Excel Shortcut Keys

The followings are Microsoft Excel shortcuts. Some short-cuts might be version specific.
Use at your own risk.
Mouse shortcuts

ShortcutDescription
Double-click (on a cell)Edit the cell contents.
Double-click (on a row/column divider)Adjust height/width to auto-fit
High-light headers of multiple rows/columns then Double-click on a row/column dividerAdjust height/width to auto-fit of all high-lighted rows/columns
Triple-clickSelect the entire contents in the cell
Click on row/column divider then dragAdjust height/width of the row/colunn
High-light headers of multiple rows/columns then Click on row/column divider then dragAdjust height/width of the rows/colunns
Ctrl + Mouse wheelZooms in and out of document.
Hold Shift + Click the cellsSelect multiple cells


Keyboard shortcuts

ShortcutDescription
F2Edit the selected cell.
F5Goto a specific cell. For example, C6.
F7Spell check selected text and/or document.
F11Create chart.
Ctrl + ASelect all.
Ctrl + BBold.
Ctrl + CCopy.
Ctrl + FFind (same as Shift + F5).
Ctrl + GGo To.
Ctrl + HReplace.
Ctrl + IItalic.
Ctrl + KInsert link.
Ctrl + NNew Workbook.
Ctrl + OOpen Workbook.
Ctrl + PPrint dialog.
Ctrl + SSave.
Ctrl + UUnderline.
Ctrl + VPaste.
Ctrl + ZUndo.
Ctrl + YRedo.
Ctrl + XCut.
Ctrl + 5Strikethrough text.
Ctrl + F3Define Name.
Ctrl + F4Exit Excel.
Ctrl + F6Switch between open workbooks.
Ctrl + F9Minimize current window.
Ctrl + F10Maximize current window.
Shift + F1Activate Help on Item.
Shift + F2Insert Comments
Shift + F3Insert Function.
Ctrl + Shift + ;Enter the current time.
Ctrl + ;Enter the current date.
Ctrl + Page downMove to next worksheet.
Ctrl + Page upMove to previous worksheet.
Ctrl + Shift + #Number Format: Date
Ctrl + Shift + @Number Format: Time.
Ctrl + Shift + !Number Format: Commas.
Ctrl + Shift + $Number Format: Currency
Ctrl + Shift + %Number Format: Percentage
Ctrl + Shift + ^Number Format: Scientific.
Ctrl + SpaceSelect entire column.
Shift + SpaceSelect entire row.
Ctrl + (Arrow key)Move to next section.

Monday, May 16, 2011

How to Add Watermark to a Microsoft Word Document.!

Top Blogs


Add Watermark to a Word Document

You can insert a watermark into a Microsoft Word document as either text or image.
Here is a sample Word Document with text watermark:

And here is an example of picture watermark:


Step-by-step to add a watermark to Word document (applied for Microsoft Word 97-2010):
Microsoft Word 97/2000/XP (2002)/2003:
  1. Open the Word document that you want to add watermark to.
  2. Select "Format" from the top menu, then select "Background", then "Printed Watermark".
  3. In the "Printed Watermark" dialog:

    A. To insert a text watermark:
    • Select the "Text watermark".
    • Then, either select a pre-defined text from the drop-down, or type in your desire text on the "Text" field.
    • Customize your watermark with other options in this dialog such as text size, text color, etc, then click "OK".
    • Watermark is now inserted into your document.

    B. To insert an image watermark:
    • Select the "Picture watermark".
    • Then click on the button "Select Picture...".
    • Navigate to the directory where your watermark picture is located. Select it and click "Insert".
    • Select a customized scale if desired, then click "OK".
    • The image is now inserted into your document as watermark.


Microsoft Word 2007/2010:
  1. Open the Word document that you want to add watermark to.
  2. Select the "Page Layout" Tab from the top menu
  3. In the "Page Background" group, select "Watermark".
  4. You can now select one of the pre-defined watermarks, or if you wish to use your own text/image, select "Custom Watermark" at the bottom.
    At the "Printed Watermark" dialog:

    A. To insert a text watermark:
    • Select the "Text watermark".
    • Then, either select a pre-defined text from the drop-down, or type in your desire text on the "Text" field.
    • Customize your watermark with other options in this dialog such as text size, text color, etc, then click "OK".
    • Watermark is now inserted into your document.

    B. To insert an image watermark:
    • Select the "Picture watermark".
    • Then click on the button "Select Picture...".
    • Navigate to the directory where your watermark picture is located. Select it and click "Insert".
    • Select a customized scale if desired, then click "OK".
    • The image is now inserted into your document as watermark.

Friday, May 13, 2011

Internet Explorer Shortcut Keys. Easy and Useful

Top Blogs


Microsoft Internet Explorer Shortcut Keys


Microsoft Internet Explorer Shortcut Keys

The followings are short-cuts for Microsoft Internet Explorer. Some keys are version specific
Use at your own risk.
Mouse shortcuts

ShortcutDescription
Double-click (On a word)Select the word.
Triple-clickSelect entire line.
Wheel clickActivate the Smooth scrolling
Hold Ctrl + Scroll Wheel forwardIncrease font size
Hold Ctrl + Scroll Wheel backwardDecrease font size
Click one point then hold Shift & click anotherCreate a selection from the two points


Keyboard shortcuts

ShortcutDescription
F1Help.
F3Toggle on/off search panel.
F4Pull down address bar.
F5Refresh current page.
F6Move focus to address bar.
F11Toggle on/off full-screen mode
Alt + (Left Arrow)Go back on history. Same pas Backspace
Alt + (Right Arrow)Go forward on history.
Ctrl + ASelect All.
Ctrl + BFavorites.
Ctrl + CCopy Selected.
Ctrl + ESearch panel.
Ctrl + FFind (on page).
Ctrl + HToggle History panel.
Ctrl + IToggle Favorites panel.
Ctrl + LOpen File. Same as Ctrl + O
Ctrl + NOpen New browser window.
Ctrl + PPrint current page / frame.
Ctrl + RRefresh. Same as F5
EscStop (while page is loading).
Ctrl + EnterAuto complete a url address. For example, type thecomputricks in the address bar and press CTRL + ENTER to get http://www.thecomputricks.com.
Ctrl + DAdd the current page to favorite.

Tuesday, May 10, 2011

Installing Windows on your Mac - Boot Camp Tool

Top Blogs


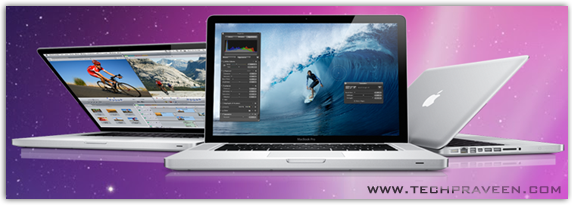
Stylish MacBook Pro Laptops How to Install Windows on Your Mac using Boot Camp
Want to know how to install Windows Xp, Windows Vista or Windows 7 on your Mac OS X? Then you are in right place.In this article, I will teach you installing windows in Mac using Boot camp assistant with screenshots.You can also use Parallels Desktop to run Windows operating system on Mac virtually.

Step-by-step Tutorial to Install Windows Using Boot Camp

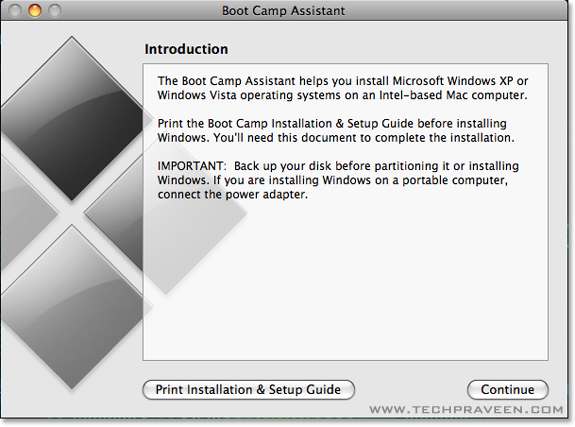
1. Goto Applications –> Utilities and open Boot Camp Assistant.
2. Click Continue on the initial Introduction screen.
Boot Camp Assistant Dialog Box How to Install Windows on Your Mac using Boot Camp
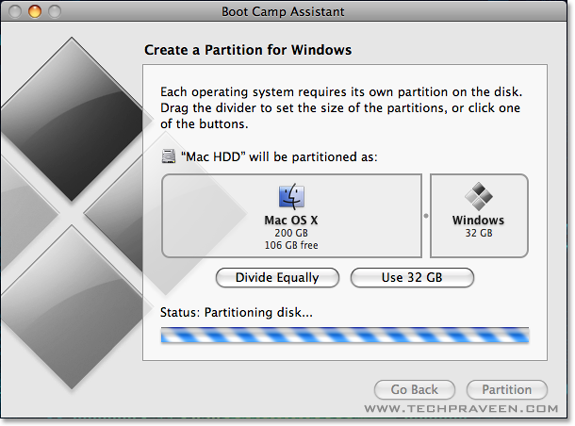
3. Set windows partition size by dragging the divider.And click Partition button.
Set Windows Partition and Click Partition Button How to Install Windows on Your Mac using Boot Camp
4. Once completed you’ll notice a new BOOTCAMP drive on your desktop.
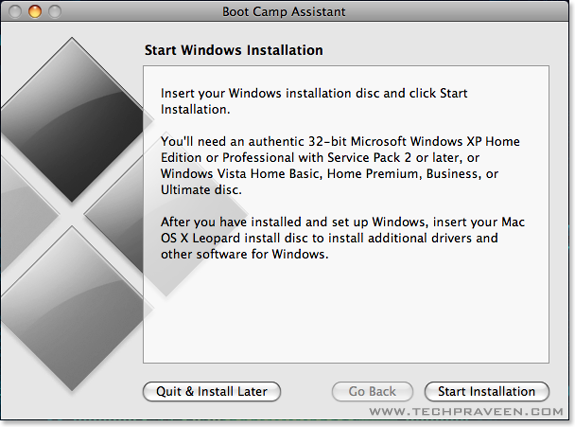
5. Now insert your Windows Xp or Vista or 7 DVD and click the Start Installation button.
Start Windows Installation in Boot Camp How to Install Windows on Your Mac using Boot Camp

Note:
In this tutorial I have used Windows Xp.
6. Your Mac will restart, and Windows Xp will boot. You’ll be prompted with a window asking you whichpartition you want to install Windows on. Select the one with BOOTCAMP in the Name column. Selecting anything else may wipe out OS X or cause serious problems. Just format BOOTCAMP partition with NTFS.
7. As usual the normal windows xp insallation process will go. icon smile How to Install Windows on Your Mac using Boot Camp
8. Once the installation has completed and your Mac has restarted again, you’ll be able to use Windows Os.
9. Now insert your Mac OS X Tiger (or Snow Leopard) DVD. When prompted, select Run setup.exe.
Note:
If you’re using Snow Leopard and a message pops up saying “Remote Install Mac OS X”, close that window and eject the CD. Put the CD in again and this time select “Open folder to view files”, navigate to the Bootcamp folder, and run setup.exe.
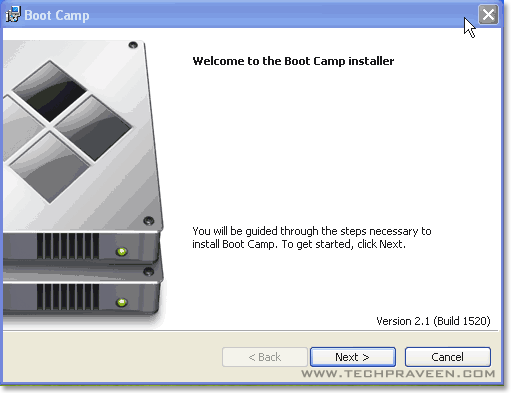
10. The Boot Camp installer will launch. Click Next to begin.
Boot Camp Drivers Installation Dialog Box How to Install Windows on Your Mac using Boot Camp
11. Select I accept the terms in the license agreement and then click Next.
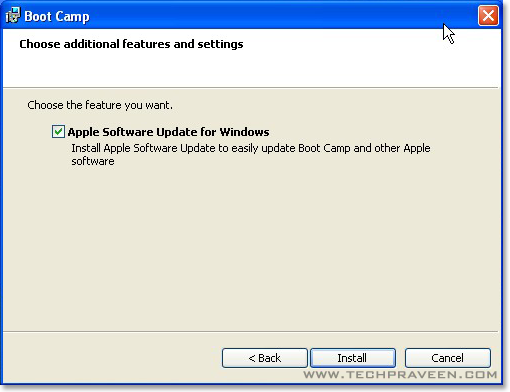
12. Choose Apple Software Update for Windows, and click Install.
Apple Software Update for Windows How to Install Windows on Your Mac using Boot Camp
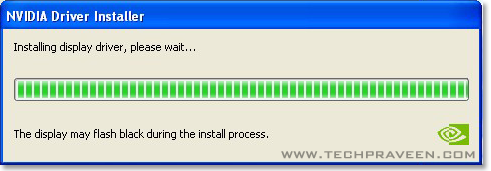
13. The Boot Camp installer will install all the required drivers.
Nvida Graphics Card drivers for windows How to Install Windows on Your Mac using Boot Camp
14. Once completed click Finish.
15. Again you’ll be prompted to reboot. Remove your OS X DVD from the drive, and click Yes to restart.
16. That’s it, you’re done! icon smile How to Install Windows on Your Mac using Boot Camp
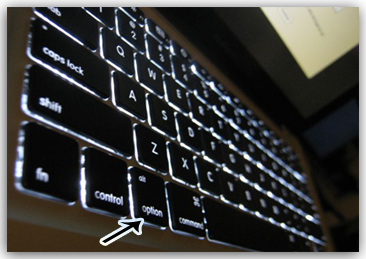
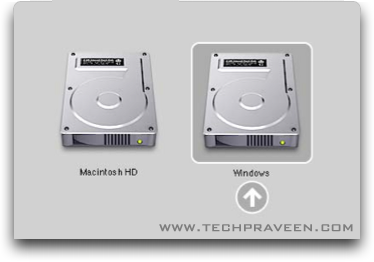
17. When your Mac boots, hold down the Option key to select which Operating System you want to boot into.
Apple Option Key How to Install Windows on Your Mac using Boot CampApple Boot Camp How to Install Windows on Your Mac using Boot Camp
Got any doubts? Post your queries below icon smile How to Install Windows on Your Mac using Boot Camp

Sunday, May 8, 2011

Microsoft Windows Shortcut Keys, Easy and Useful

Top Blogs


Microsoft Windows Shortcut Keys


Microsoft Windows Shortcut Keys

This is a listing of some common shortcut keys in different versions Microsoft Windows.
Some shortcut keys below are not supported in all versions of Windows.
The shortcut keys on this page are only applicable for Windows in general, if you are looking for shortcut keys for a specific application (i.e. Excel, Word, etc..) please see the links at the bottom of this page.
Use at your own risk.
Shortcut KeySupported Window VersionsShort Key Description
Alt + (double-click)95, 98, ME, NT, 2000, XP, VistaOpen Properties dialog of selected item.
Alt + Enter95, 98, ME, NT, 2000, XP, VistaOpens properties window of selected item.
Alt + Esc95, 98, ME, NT, 2000, XP, VistaSwitch Between open tasks available on the taskbar.
Alt + F495, 98, ME, NT, 2000, XP, VistaClose the top (focused) window.
Alt + Tab95, 98, ME, NT, 2000, XP, VistaSwitch between open windows.
Alt + Tab + Shift95, 98, ME, NT, 2000, XP, VistaSwitch between open windows, backward.
Ctrl + Alt + Delete (or Del)95, 98, ME, NT, 2000, XP, VistaBring up the Windows Task Manager, or reboot computer.
Ctrl + Esc95, 98, ME, NT, 2000, XP, VistaBring up the Windows Start menu.
Ctrl + '+' ('+' key on the keypad)98, ME, NT, 2000, XP, VistaAutofit the widths of all columns (if available) in current window.
Ctrl + F495, 98, ME, NT, 2000, XP, VistaClose sub window/tab.
Ctrl + Tab95, 98, ME, NT, 2000, XP, VistaSwitch between existing tabs (within a window).
Ctrl + Tab + Shift95, 98, ME, NT, 2000, XP, VistaSwitch between existing tabs (within a window), backward
F195, 98, ME, NT, 2000, XP, VistaOpen Help for Windows or focused application.
F295, 98, ME, NT, 2000, XP, VistaRename.
F395, 98, ME, NT, 2000, XP, VistaFind/Search.
F495, 98, ME, NT, 2000, XP, VistaSelect drives or display the list of drives
F595, 98, ME, NT, 2000, XP, VistaRefresh.
F695, 98, ME, NT, 2000, XP, VistaSwitch focus to the address bar (if exists).
F1095, 98, ME, NT, 2000, XP, VistaSwitch focus to the top menu bar.
Shift + F1095, 98, ME, NT, 2000, XP, VistaSame as mouse right-click on the select item.
Print Screen95, 98, ME, NT, 2000, XP, VistaCapture a screenshot of the entire desktop to clipboard.
Print Screen + Alt95, 98, ME, NT, 2000, XP, VistaCapture a screenshot of just the top(focused) window to clipboard.
Shift + Delete (or Del)95, 98, ME, NT, 2000, XP, VistaPermanently delete selected file(s)/folder(s) (bypass recycle bin)
Shift (hold while inserting an audio CD to drive)95, 98, ME, NT, 2000, XP, VistaPrevent autoplay.
* (keypad) on Windows Explorer.95, 98, ME, NT, 2000, XP, VistaExpand all sub-directories from the selected item.
+ (keypad) on Windows Explorer.95, 98, ME, NT, 2000, XP, VistaExpand only the first level of selected item.
- (keypad) on Windows Explorer.95, 98, ME, NT, 2000, XP, VistaCollapse
Most keyboards have a Windows Key (key with a Windows icon). This key provides additional shortcuts for Microsoft Windows. Below is a list of the shortcut keys by combining the Windows key and other keys.
Shortcut KeysDescription
WINDOWS-KEYBring up the Windows Start menu.
WINDOWS-KEY + F1Bring up the Windows Help.
WINDOWS-KEY + eOpen Microsoft Explorer.
WINDOWS-KEY + fWindows Search.
WINDOWS-KEY + Ctrl + fSearch for computers
WINDOWS-KEY + dMinimizes all and bring up desktop, or restore all
WINDOWS-KEY + lLock the computer (Windows XP & newer).
WINDOWS-KEY + mMinimizes all windows.
WINDOWS-KEY + Shift + MRestore all. Opposite with WINDOWS-KEY + M and WINDOWS-KEY + D.
WINDOWS-KEY + rOpen the run window.
WINDOWS-KEY + uUtility Manager.
WINDOWS-KEY + TabCycle through the programs on task bar.
WINDOWS-KEY + Pause/BreakOpen the System Properties window.

Friday, May 6, 2011

PC shortcut Keys. Easy and Useful !!

Top Blogs


Basic PC Shortcut Keys


Basic Shortcut Keys

The followings are some basic PC shortcut keys that are supported in most IBM compatible computers. They are also supported in most application software.
Use at your own risk.
Shortcut KeysSupported Window VersionsDescription
Alt + e95, 98, ME, NT, 2000, XP, VistaPull down the top Edit menu.
Alt + f95, 98, ME, NT, 2000, XP, VistaPull down the top File menu
Ctrl + a95, 98, ME, NT, 2000, XP, VistaSelect all text.
Ctrl + c95, 98, ME, NT, 2000, XP, VistaCopy selected item(s) (to clipboard).
Ctrl + f95, 98, ME, NT, 2000, XP, VistaFind.
Ctrl + v95, 98, ME, NT, 2000, XP, VistaPaste copied item(s) from clipboard
Ctrl + x95, 98, ME, NT, 2000, XP, VistaCut.
Ctrl + Ins95, 98, ME, NT, 2000, XP, VistaSame as Ctrl + c
Ctrl + (left arrow)95, 98, ME, NT, 2000, XP, VistaMove one word to the left at a time.
Ctrl + (right arrow)95, 98, ME, NT, 2000, XP, VistaMove one word to the right at a time.
Shift + Ins95, 98, ME, NT, 2000, XP, VistaSame as Ctrl + v
Shift + Delelte (or Del)95, 98, ME, NT, 2000, XP, VistaCut. Or permanently delete selected item(s) on Windows Explorer.
F195, 98, ME, NT, 2000, XP, VistaHelp.
Home95, 98, ME, NT, 2000, XP, VistaJump to the beginning of the line or page.
Ctrl + Home95, 98, ME, NT, 2000, XP, VistaJump to the beginning of the document or page.
End95, 98, ME, NT, 2000, XP, VistaJump to the end of the line or page.
Ctrl + End95, 98, ME, NT, 2000, XP, Vistaump to the end of the document or page.
Shift + Home95, 98, ME, NT, 2000, XP, VistaSet selection (highlight) from current position to beginning of the line or page.
Shift + End95, 98, ME, NT, 2000, XP, VistaSet selection (highlight) from current position to end of the line or page.
Shift + (left arrow)95, 98, ME, NT, 2000, XP, VistaSet selection (highlight) from current position to the left, one character at a time.
Shift + (right arrow)95, 98, ME, NT, 2000, XP, VistaSet selection (highlight) from current position to the right, one character at a time.
Shift + (down arrow)95, 98, ME, NT, 2000, XP, VistaSet selection (highlight) from current position to the next line down.
Shift + (up arrow)95, 98, ME, NT, 2000, XP, VistaSet selection (highlight) from current position to the next line up.

Thursday, May 5, 2011

Wireless Hard Drives : Boost Your Computing Capacity

Top Blogs

It may be obvious enough for some people but for those who aren't up-to-date on every latest invention to hit the market, you may not be familiar with some of the new wireless hard drives that are slated to hit the market this year. People all over Canada and America are getting ready to see all of the ways this invention will revolutionize the IT industry. Where once a person would have to look forToronto self storage to keep all of their electronics and devices can now carry it all directly in the palm of our hand. We're becoming an increasingly mobile society and these wireless devices promise only to increase this trend.

At its most basic level, a wireless hard drive is a hard disc drive that allows users to connect to it from any device by using a wireless connection. This has become an increasingly popular option for areas of the market where people are forced to deal with limited storage space, like phones. With this invention, you'd be able to connect to a wireless hard drive much the same way a person would connect to their modem or router to get Internet access but this is where the similarities stop.

Seagate is a technology company that has created a portable hard drive that boasts an astounding 500GB of space. The Seagate GoFlex Satellite hasn't even hit the stores yet and won't be released until July later this year but that hasn't stopped the online world from reporting on its multiple applications. It will primarily be used for mobile/wireless devices for supplemental storage purposes but this device could be a huge game changer.

Mobile devices, like the Android and iPhone, can do amazing things that no one thought possible but its storage capacity has been somewhat limited. Though incremental improvements have been made in current cell phones, these new wireless devices could essentially make your mobile device a walking computer in the palm of your hand. This system offers the ability for users to stream video up to five hours, expanded battery life, and the option to serve up to three devices simultaneously.

Many devices similar to this are likely to hit the market in coming years and produce huge leaps forward in the mobile computing community. The possibly exists that, in the near future, people will be able to carry every piece of information about themselves while staying connected and all from a hand held device. With this additional storage option, it will be interesting to see what further innovations in application and software development will occur as a direct result from unencumbered computing power.

Monday, April 25, 2011

156 Useful Run Commands....!!

Top Blogs


TO ACCESS…RUN COMMAND
Accessibility Controlsaccess.cpl
Accessibility Wizardaccwiz
Add Hardware Wizardhdwwiz.cpl
Add/Remove Programsappwiz.cpl
Administrative Toolscontrol admintools
Adobe Acrobat (if installed)acrobat
Adobe Designer (if installed)formdesigner
Adobe Distiller (if installed)acrodist
Adobe ImageReady (if installed)imageready
Adobe Photoshop (if installed)photoshop
Automatic Updateswuaucpl.cpl
Bluetooth Transfer Wizardfsquirt
Calculatorcalc
Certificate Managercertmgr.msc
Character Mapcharmap
Check Disk Utilitychkdsk
Clipboard Viewerclipbrd
Command Promptcmd
Component Servicesdcomcnfg
Computer Managementcompmgmt.msc
Control Panelcontrol
Date and Time Propertiestimedate.cpl
DDE Sharesddeshare
Device Managerdevmgmt.msc
Direct X Control Panel (if installed)*directx.cpl
Direct X Troubleshooterdxdiag
Disk Cleanup Utilitycleanmgr
Disk Defragmentdfrg.msc
Disk Managementdiskmgmt.msc
Disk Partition Managerdiskpart
Display Propertiescontrol desktop
Display Propertiesdesk.cpl
Display Properties (w/Appearance Tab Preselected)control color
Dr. Watson System Troubleshooting Utilitydrwtsn32
Driver Verifier Utilityverifier
Event Viewereventvwr.msc
Files and Settings Transfer Toolmigwiz
File Signature Verification Toolsigverif
Findfastfindfast.cpl
Firefox (if installed)firefox
Folders Propertiesfolders
Fontscontrol fonts
Fonts Folderfonts
Free Cell Card Gamefreecell
Game Controllersjoy.cpl
Group Policy Editor (XP Prof)gpedit.msc
Hearts Card Gamemshearts
Help and Supporthelpctr
HyperTerminalhypertrm
Iexpress Wizardiexpress
Indexing Serviceciadv.msc
Internet Connection Wizardicwconn1
Internet Exploreriexplore
Internet Propertiesinetcpl.cpl
Internet Setup Wizardinetwiz
IP Configuration (Display Connection Configuration)ipconfig /all
IP Configuration (Display DNS Cache Contents)ipconfig /displaydns
IP Configuration (Delete DNS Cache Contents)ipconfig /flushdns
IP Configuration (Release All Connections)ipconfig /release
IP Configuration (Renew All Connections)ipconfig /renew
IP Configuration (Refreshes DHCP & Re-Registers DNS)ipconfig /registerdns
IP Configuration (Display DHCP Class ID)ipconfig /showclassid
IP Configuration (Modifies DHCP Class ID)ipconfig /setclassid
Java Control Panel (if installed)jpicpl32.cpl
Java Control Panel (if installed)javaws
Keyboard Propertiescontrol keyboard
Local Security Settingssecpol.msc
Local Users and Groupslusrmgr.msc
Logs You Out Of Windowslogoff
Malicious Software Removal Toolmrt
Microsoft Access (if installed)msaccess
Microsoft Chatwinchat
Microsoft Excel (if installed)excel
Microsoft Frontpage (if installed)frontpg
Microsoft Movie Makermoviemk
Microsoft Paintmspaint
Microsoft Powerpoint (if installed)powerpnt
Microsoft Word (if installed)winword
Microsoft Syncronization Toolmobsync
Minesweeper Gamewinmine
Mouse Propertiescontrol mouse
Mouse Propertiesmain.cpl
Nero (if installed)nero
Netmeetingconf
Network Connectionscontrol netconnections
Network Connectionsncpa.cpl
Network Setup Wizardnetsetup.cpl
Notepadnotepad
Nview Desktop Manager (if installed)nvtuicpl.cpl
Object Packagerpackager
ODBC Data Source Administratorodbccp32.cpl
On Screen Keyboardosk
Opens AC3 Filter (if installed)ac3filter.cpl
Outlook Expressmsimn
Paintpbrush
Password Propertiespassword.cpl
Performance Monitorperfmon.msc
Performance Monitorperfmon
Phone and Modem Optionstelephon.cpl
Phone Dialerdialer
Pinball Gamepinball
Power Configurationpowercfg.cpl
Printers and Faxescontrol printers
Printers Folderprinters
Private Character Editoreudcedit
Quicktime (If Installed)QuickTime.cpl
Quicktime Player (if installed)quicktimeplayer
Real Player (if installed)realplay
Regional Settingsintl.cpl
Registry Editorregedit
Registry Editorregedit32
Remote Access Phonebookrasphone
Remote Desktopmstsc
Removable Storagentmsmgr.msc
Removable Storage Operator Requestsntmsoprq.msc
Resultant Set of Policy (XP Prof)rsop.msc
Scanners and Camerassticpl.cpl
Scheduled Taskscontrol schedtasks
Security Centerwscui.cpl
Servicesservices.msc
Shared Foldersfsmgmt.msc
Shuts Down Windowsshutdown
Sounds and Audiommsys.cpl
Spider Solitare Card Gamespider
SQL Client Configurationcliconfg
System Configuration Editorsysedit
System Configuration Utilitymsconfig
System File Checker Utility (Scan Immediately)sfc /scannow
System File Checker Utility (Scan Once At The Next Boot)sfc /scanonce
System File Checker Utility (Scan On Every Boot)sfc /scanboot
System File Checker Utility (Return Scan Setting To Default)sfc /revert
System File Checker Utility (Purge File Cache)sfc /purgecache
System File Checker Utility (Sets Cache Size to size x)sfc /cachesize=x
System Informationmsinfo32
System Propertiessysdm.cpl
Task Managertaskmgr
TCP Testertcptest
Telnet Clienttelnet
Tweak UI (if installed)tweakui
User Account Managementnusrmgr.cpl
Utility Managerutilman
Windows Address Bookwab
Windows Address Book Import Utilitywabmig
Windows Backup Utility (if installed)ntbackup
Windows Explorerexplorer
Windows Firewallfirewall.cpl
Windows Magnifiermagnify
Windows Management Infrastructurewmimgmt.msc
Windows Media Playerwmplayer
Windows Messengermsmsgs
Windows Picture Import Wizard (need camera connected)wiaacmgr
Windows System Security Toolsyskey
Windows Update Launcheswupdmgr
Windows Version (to show which version of windows)winver
Windows XP Tour Wizardtourstart
Wordpadwrite

Share

Twitter Delicious Facebook Digg Stumbleupon Favorites More